
Pork. We’ve been told for years that it is the “other white meat.” Of course, we have all had our share of chops over the years, as that is one of the go-to Southern comfort food meals that is not only delicious, but affordable for families on a budget.
If you are a fan of pork, then this month’s Hamm’s feature is for you. Not only did we embark on a pork-a-palooza of sorts, we did it with top-quality products. Our pork butt for March is from Pederson Farms, which is known for its fantastic pork products.
For starters, if you are going to entertain your guests with pork, then a top-notch butt should always be on your radar. They’re delicious, versatile and borderline idiot-proof. Once finished, you can use the pulled pork for sandwiches, tacos, bowls, burritos, soups or even breakfast. And although it takes some time, cooking a pork shoulder is simple to do.
Once you have opened your pork butt and drained off the excess juices, pat it dry with some paper towels. There has been much debate among BBQ communities about whether it is viable or necessary to inject your shoulder before cooking. I fall on team injection, as I feel it really makes for a moist and juicy final product. For my injection, I use a combination of apple juice, water, white sugar, salt and Worcestershire sauce. Let the salt and sugar sit for a minute to begin to dissolve, and then whisk the solution until it is well mixed and the solids are incorporated. Once the solution is complete, use a meat injector (you can find these on Amazon) to inject the brine into the shoulder. You will see some that will leach out during the process, but there is plenty that is staying put and will help the meat stay juicy as the shoulder smokes.
On to seasoning. Just as there has been plenty of controversy on the injecting aspect of the shoulder cook, there is also a nice debate about using a binder. What is a binder, you might ask? Well, some pitmasters will use a condiment of some kind to wet the meat so the seasoning will adhere to build bark during the cook. To be honest, I am kind of indifferent when it comes to using a binder, but for this cook I did use some good old trusty yellow mustard. After adding a thin coating of the mustard, I chose to season with Meat Church Gospel and Honey Hog Hot seasonings, going light with the Gospel and then liberal with the Honey Hog Hot.
For this cook, I used my Traeger Pro 780 and set the temperature to 225 degrees. At this temperature, the process took right at about nine hours. I chose oak pellets for the shoulder, as that is more traditional Texas flavor, but you could certainly use Apple or Cherry wood pellets, as well.
One of the things we are looking for during the shoulder cook is a great bark to begin building on the outside. This should start to happen about the two-hour mark and should continue until it is time to wrap the shoulder. Even though I injected the shoulder with that liquid we discussed, it is never a bad idea to introduce some extra moisture. So, along with the shoulder, I add a small aluminum pan with some additional apple juice to the smoker to help keep moisture in the cook. I will also spritz the shoulder every 30-45 minutes with apple juice to help prevent the meat from drying out.
There are a couple different methods you can use to finish up your pork shoulder. The first option is simply letting it go until you reach about 205 internal temperature. However, using this method, you run the risk of the dreaded “stall” and having to sacrifice time to get through it. My personal favorite way to finish a pork shoulder is to remove from the smoker when you have a bark you are happy with, then add the meat to an aluminum pan and top with some butter, brown sugar and a little more of your seasoning choice. Then cover everything with foil and place back in the smoker until you reach about 205 degrees. The foil tent will help the meat along and prevent the stall. The butter, brown sugar and extra seasoning just add extra depth of flavor.
Once we have reached desired temp, remove the shoulder and place in a cooler to rest for at least an hour. This will let the juices redistribute through the meat and allow the muscles to relax, creating a fantastic, finished product. Once rested, remove the foil, glove up and remove the bone, which should come out clean, and shred the pork using your hands.
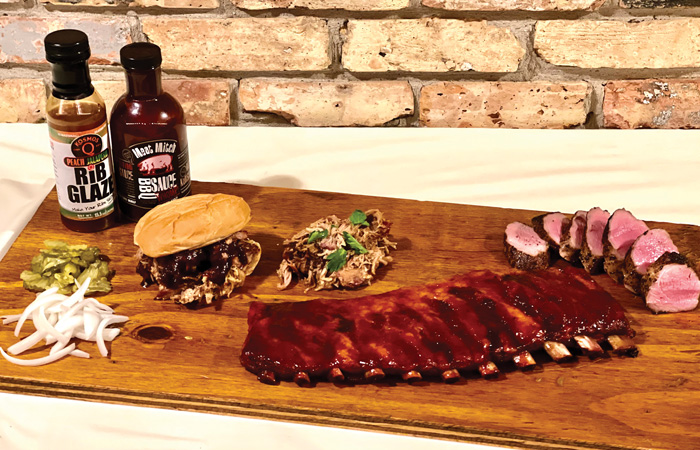
Once this is done, it’s time to create your favorite sandwich, taco or even just eat the pulled pork with a little of your favorite sauce.
My go-to use for pulled pork is a great Memphis-style sandwich with some of the pork, some cole slaw and a little barbecue sauce. It’s hard to beat the juicy pork and the cool crisp crunch of the slaw all together on a bun.
If you are looking for super simple, then take some of the shredded pork and add it on a corn tortilla with some chopped white onion, cilantro and some salsa. Boom. Street tacos. Point is, this pulled pork, while a little time-consuming, is incredibly easy to produce quality results that can be used in a multitude of different ways.
Our second bit of pork goodness for this month is a fantastic rack of ribs, which also came from Pederson Farms. Ribs can be a little tricky to perfect depending on what you are looking for. Oftentimes you will hear someone refer to ribs as “fall off the bone.” In reality, competition rib cooks don’t prepare them to fall off the bone. Most competition cooks want their ribs to still maintain integrity and require a nice bite. So, if we have fall-off-the-bone ribs, while they are probably very tender, in the eyes of a competition pitmaster, they are probably overdone.
There are multiple methods you can use to cook ribs. There is the 3-2-1 method, which corresponds to the number of hours unwrapped and wrapped. Three hours unwrapped, two hours wrapped in foil, and then a final hour unwrapped. I have found this method to be a bit too much time on the heat, which leads to the ribs disintegrating as you try to cut them (the fall off the bone we talked about).
For me, I use a simple method that yields solid results. For starters, you will want to remove the membrane from the bone side of the rack. If left on, the membrane not only prevents getting that great smoke flavor, but also makes for a strange texture when your guests bite in. It’s easy to remove: just find the edge with a sharp knife and once you have a bit to pull on, use a paper towel to help with grip and rip it right off. It’s easy and really helps make the finished product a lot better.
Again, as with the pork butt, there is some debate as to whether we should use a binder for ribs, and that is totally up to you. I chose to go with no binder for this cook, but mustard would work, and I have even seen some recent grumblings online of some that are using things like Chick Fil-A sauce as a binder on ribs. Again, it is totally up to you.
Depending on what flavor profile you want to achieve, the rub you select is also based on your taste and what you like. For this rack, I used something similar to the pork butt, which was a nice coating of Meat Church Honey Hog Hot and Holy Cow. I really like how pepper forward their Holy Cow is, and the Honey Hog Hot adds some sweetness and a nice bit of heat on the back end.
I decided to run my smoker at 250 degrees for this cook, but you could absolutely roll at 225 or even 275 if you wanted to get some extra smoke on them or speed up the process a bit. At 250 degrees, you are likely in for a five-to-six-hour cook, depending on how they come along. Every rack is different, so use your eyes and touch to really get a feel for how they look and feel.
Again, I went with an Oak pellet for this cook, but feel free to choose whatever makes sense. After seasoning liberally, I added the rack on the smoker and closed the lid. As with the butt, I spritz with apple juice about once an hour, or whenever the meat seems to be getting a little dry. After about two hours, I begin to watch to see how the rack looks. At about two-and-a-half hours, this rack looked ready to wrap in foil.
The foil wrap is a necessary step to not only speed up the cooking process a bit, but the wrap keeps all that moisture in one convenient pouch and really gives you a juicy final product. I wrap with a little brown sugar, several pats of butter and some locally sourced honey. Add a layer of this mixture on the foil and then add the ribs to it meat side down. Wrap tightly and then add back to the smoker for another two hours or so.
After another couple hours, the ribs should be close to done. Be sure that you are using more feel to determine doneness than say, a meat thermometer, as probing near a bone can give a false internal temperature reading.
At this point, you need to make one final decision about your ribs. To sauce or not to sauce? I tend to prefer dry ribs, but on this occasion, I was in the mood for the sloppy sauced variety. Also, admittedly, the sauced ribs tend to photograph better, so I figured why not? For the sauce, I used a combination of Meat Mitch’s Womp Sauce and Kosmos Peach Jalapeño Rib Glaze. I went with two parts Mitch’s to one-part Kosmos. The Womp sauce adds some sweetness and body, while the Kosmos has a little bite from the jalapeño and gives the final product that shine that really makes the rack pop. Apply the sauce generously and then return to the smoker for 10-15 minutes to tack up the sauce so when your guests take that initial bite, they don’t end up with it running down their chin.
There you have it. Pork ribs the easy way. Learn how to execute a rack of these bad boys and you will have a football Sunday or backyard BBQ staple for years to come.
The final piece of our porky puzzle for March is the always fantastic pork tenderloin. The tenderloin of the pig, much like the beef tenderloin, is the most tender piece of meat that we get from the hog. When prepared properly, this cut is an affordable, dynamite meal that will impress your dinner guests and won’t break the bank like similar beef options.
For my tenderloin, I chose the tried-and-true sous vide method. We have discussed sous vide before in this feature, as it is a great way to prepare just about any cut of meat to be sure that you get consistent, delicious results every time. You could also smoke or even grill the tenderloin, depending on what you prefer.
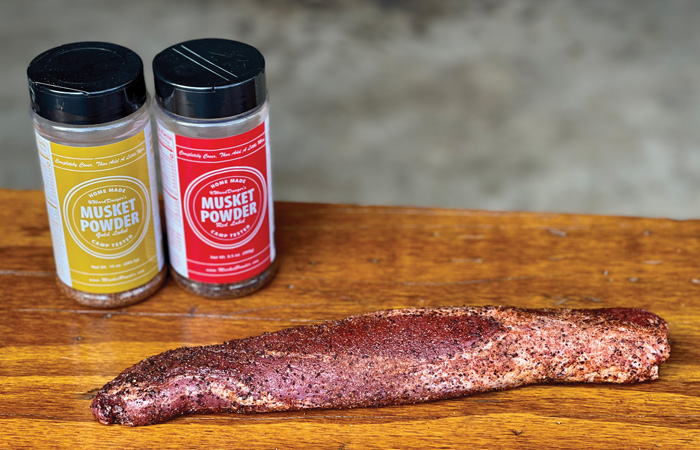
There is minimal preparation with this cut, just pat dry with a paper towel and season generously. I chose a little something different for this cook than the previous two. There is a fabulous local seasoning that I discovered a couple years ago and I really enjoy. It’s called Musket Powder and it is actually a coffee-based rub. Now, I know that sounds strange, but trust me, you will love it. I used a combination of the red label and the gold label on this cook.
Once seasoned, vacuum seal and drop in the water bath, running the sous vide at about 135 degrees. For pork, you can leave it in the bath anywhere from about 90 minutes to four hours, but any longer than that and you run the risk of textural compromise. I sous vide this one for a little less than two hours to make sure it had plenty of time to come up to temp.
One common misconception about pork is that any pink in the center means it’s undercooked. In reality, to assure you aren’t completely drying out the meat, you want a touch of pink in the center. Pork is considered safe to consume at 145 degrees. So if you see a touch of pink in the center, don’t be alarmed, as this means it’s probably still very tender and juicy. After the sous vide bath at 135, I removed the tenderloin from the bag and seared it on my Blackstone griddle over medium-high heat to make sure the internal temp got to about 150, which is a nice medium. As you would with a steak, be sure to rest the tenderloin for at least a few minutes before slicing to assure the juices redistribute throughout.
We paired our tenderloin medallions with some crispy baked parmesan Brussel sprouts and some sweet potato mash. It was a meal that couldn’t be simpler, and didn’t put any strain on the monthly food budget.
Pork. The other white meat. Three different cuts prepared three different ways, with three very tasty results. Of course, as always, these are my preferred methods for each cut, but by no means is this the only way to do it. Experiment, try different methods and different seasonings based on what you and your family enjoy. As always, happy cooking.